I apologize to those waiting to see more art history lessons posted here. My family and I have had some unexpected challenges so I have not had time lately to work on this blog. I hope to get back to posting more lessons and craft projects when things settle down for us. Thank you for your patience and enjoy the lessons I have posted so far.
Jeannie Sophia

Wednesday, April 3, 2013

Thursday, January 17, 2013
Japanese Art - Lesson 1
This is the first in a series of Japanese Art History lessons for children that I created last year. I'm presenting them to a class again this semester so I plan to post the lessons as I go. The children really seemed to enjoy these lessons. I had a variety of ages in the class ranging from 8 - 14. I love Japanese art so this was a fun class for me to teach. The first lesson is on Japanese Woodblock Prints. I have included links throughout this post to the books I referred to for this lesson, some of the art supplies I used and handouts I created. Please leave a comment below if any of the links do not work for you. You can also click on any of the images here to see them larger. All photos included are mine or are photographs in the public domain.
Japanese Woodblock Prints
For this lesson I focused on ukiyo-e genre prints from the Edo period that were produced roughly between the 1620s and 1867. Several different artisans were involved in the production of a woodblock print. First an artist created an original picture with brush and ink. This picture was called the model. The model was then placed in reverse on top of a piece of cherry wood. Next the engraver carefully carved out all of the wood between each line which left the picture in relief on the wood. The wood was then inked by a printer and then a damp sheet of paper was placed on top and smoothed down with a baren (a lacquered disk wrapped in bamboo leaves). The paper was carefully peeled away from the woodblock and an exact copy of the original picture appeared on the paper. To make another print the printer just had to ink the block again. For black and white pictures one block was used. If additional colors were used then one block was carved for each color.
Ukiyo-e means "pictures of the floating world" or "scenes of transitory importance". It is a word of Buddhist origin and refers to the impermanence of things in this world. The scenes and subjects of the prints capture a passing moment in time and give a glimpse of everyday life in Japan during that period.
During the time that Japan was ruled by the Tokugawa shoguns (250 years), Japan was a closed country. They had very little contact with the outside world. The ruling shoguns believed that this was necessary to maintain order within the country. Japanese art flourished during this time. It was also a time of economic growth in Edo especially for the merchant class. Edo is present day Tokyo and was the seat of government for the ruling shogun. Ukiyo-e prints became the art of the merchant class and there was a great demand for woodblock prints at that time.
I highly recommend the book How to Look at Japanese Art by Stephen Addiss if you would like to learn more about Japanese Art. He gives a great, easy to understand overview of several forms of Japanese art and some of its typical features. Another helpful book for this lesson is a book for older children called Art of Japan: Woodblock Color Prints by Carol Finley. It gives a brief description and history of ukiyo-e prints as well as many wonderful illustrations. If you can not easily locate these books at your local library you can still find many helpful resources on the web with more information about woodblock prints and many examples of these prints.
Other resources: Vocabulary Handout and Typical Features of Japanese Art
STORY:
For the story portion of class I read a few chapters from the book The Old Man Mad About Drawing: A Tale of Hokusai by Francois Place. Katsushika Hokusai was a very popular print artist during the Edo period. He is best known for his series of prints Thirty-six Views of Mount Fuji. In the west his most famous print is The Great Wave off Kanagawa (see the picture to the right). The book The Old Man Mad About Drawing is a fictional tale of Hokusai and a little boy named Tojiro. The book is too long for me to read during a class period so I chose a few chapters to read because they gave a great description of woodblock printmaking. If you are doing this lesson at home with your own children you may want to read the entire book with them. I gave my class a little background info on the characters in the story and then read aloud the chapters At the Old Painter's House, The Woodblock Engraving Studio and The Great Wave. I briefly showed them a copy of the print The Great Wave off Kanagawa while reading the chapter about that print and then we discussed the print more fully later in the class.
If you can not find this children's book at your local library or on inter-library loan you may be able to find one of these other books about Hokusai:
One Day in Japan with Hokusai by Julia Altmann
Hokusai: The Man Who Painted a Mountain by Deborah Kogan Ray
The Great Wave: A Children's Book Inspired by Hokusai by Veronique Massenot
However, the first book I mentioned is the one I prefer since it gives such a great explanation and pictures of the printmaking process as well as a delightful fictional story about the artist Hokusai. The artist signed his works with various names as he went through different phases and styles in his career. The name he chose for himself later in life was "Gakyō Rōjin Manji" which means the Old Man Mad About Drawing.
EXAMPLES OF ART:
Before showing the children examples of Japanese woodblock prints I went over some of the typical features of Japanese art. For class I wrote out these characteristics on a poster board to make it easy for everyone too see. This list does not include all of the characteristics of Japanese art, but gives a basic overview. I read through each one and explained them briefly. I will refer back to these characteristics throughout the lessons especially while we are viewing some examples of Japanese art.
The first print I showed the children was the Hokusai print The Great Wave off Kanagawa (see the picture above) that was described in the book excerpt that I read at the beginning of class. I asked the children what they saw in the picture that is related to nature (see the list of characteristics). Some answers were water, ocean, wave, Mount Fuji, mountain, people (the Japanese consider humans as a part of nature). We went through several of the characteristics such as space - I pointed out the asymmetry and empty space in the picture. I also pointed out how the picture captures a moment in time which is another characteristic of Japanese art and ukiyo-e woodblock prints in particular. I asked, what will happen in a few seconds to the wave? The wave will come crashing down. I pointed out Mount Fuji in the background and asked what will happen to Mount Fuji in a few seconds? Nothing. Mount Fuji is more permanent and stable in contrast to the temporary wave that will soon come crashing down and disappear. I also pointed out the smaller wave in the foreground. What does the wave look like? It is another Mount Fuji and looks similar to the real Mount Fuji in the background yet the wave is only passing. We talked a bit about how the people in the boats were reacting to the wave and how we might react in a similar situation. The Japanese try to live in harmony with nature instead of trying to control it or master it. They realize that some things in nature are more powerful than themselves such as a huge wave. The people in the boats are not panicking, but seem to be calm and bowing down to the wave and to their fate. There are many things you can point out and discuss with the children in this wonderful and powerful picture.
I went on to explain that Hokusai created many prints with Mount Fuji in them. Mount Fuji is a very popular subject in Japanese art. In some of Hokusai's prints Mount Fuji is in the background and in some it is the main subject of the picture. I showed them a Hokusai print with a large Mount Fuji that takes up almost the entire picture. If you do not have any books at your local library with examples of Japanese prints then you can do an internet search and find many examples of Hokusai's work as well as other Japanese print artists.
Next I showed the children a couple of prints by Hiroshige another well known and well loved print artist from the Edo period. I especially like the print of a man chasing his hat in the wind (click on the image to see it larger). This is a great example to discuss playfulness and humor in Japanese art. Remember to refer back to the list of characteristics and ask the children which ones they notice in the various prints you view. You might also mention that after Japan was opened to the outside world in the late 1800s many prints made their way to Europe. These prints greatly influenced the Impressionist and Post-Impressionist artists of the time including Vincent Van Gogh.
I also showed the children a few other examples of Japanese prints by other artists. I wanted to show them examples of some of the main subjects that are depicted in Japanese prints such as kabuki theater actors, children, birds and flowers and beautiful women. I especially like the print by Harunobu, Woman Admiring Plum Blossoms at Night . Do show the children a variety of different prints, but don't overwhelm them with too many. It's better to take a little more time to really look at and discuss a few select prints than to try to go through too many at one time. One of the goals of these lessons is to help children learn to look at and think about art.
There are so many interesting subjects in Japanese woodblock prints that you can discuss with your children so have fun with it!
PROJECT:
I wanted the children to have an idea of what it's like to make a print, but of course actual carving of wood blocks was out. So we used scratch foam. They do not carry this at my local craft store so I had to order it online. It can be purchased here
 . It becomes a little pricey with shipping however, so if you aren't doing this project in a classroom setting you may want to just use the foam from one of the trays on which produce is packaged. Just cut away the sides and use the remaining bottom piece. You can use a pencil or pen to scratch the picture into the foam. Have the children scratch it deep enough to make a decent impression, but not hard enough that it tears all the way through. I offered the kids in my class some scrap paper to sketch a design first if they needed and then they used pens or pencils to draw into the foam.
We used water soluble block printing ink, but you can use tempera or acrylic paint instead. We also used brayers to roll on the ink, but you can brush the paint on if you don't have the rollers on hand. I squirted out some ink on paper plates and coated the brayers with the ink before letting the children roll the ink on their foam piece themselves. While the foam piece was lying on the table with the picture side up I had the kids press a blank piece of paper on top of the inked foam and press down while smoothing it out with their hands. Then they peeled off the paper. I have an extra large class this session so I wasn't able to help each individual child as much as I would have liked, but they all did really well and were able to do it mostly on their own. Their pictures came out nicely except I didn't think to mention to them that if they wrote any letters or words they would come out in reverse when printed. So a lesson learned for me!
I gave the children a vocabulary handout to take home as well as a map of Japan.
Optional project:
A second quick project I had the children make at the end of class was their own inkstone (suzuri) to be used in next week's lesson. An inkstone is used in ink brush painting. Traditionally an ink stick is rubbed in water in the inkstone which creates a liquid ink. We will be using ink that is already in liquid form in my class, but I thought it would be fun for the children to have their own inkstones. Real inkstones are made from actual stone, but we made ours out of black self-hardening clay. I gave the kids some bamboo skewers to carve designs in their inkstones if they wished. After the stones are dry I will brush on a coat of Mod Podge to make them less porous and more liquid proof. You may be able to brush on some white glue mixed with a bit of water instead if you don't have any Mod Podge on hand.
 |
| South Wind, Clear Sky by Hokusai |
Japanese Woodblock Prints
For this lesson I focused on ukiyo-e genre prints from the Edo period that were produced roughly between the 1620s and 1867. Several different artisans were involved in the production of a woodblock print. First an artist created an original picture with brush and ink. This picture was called the model. The model was then placed in reverse on top of a piece of cherry wood. Next the engraver carefully carved out all of the wood between each line which left the picture in relief on the wood. The wood was then inked by a printer and then a damp sheet of paper was placed on top and smoothed down with a baren (a lacquered disk wrapped in bamboo leaves). The paper was carefully peeled away from the woodblock and an exact copy of the original picture appeared on the paper. To make another print the printer just had to ink the block again. For black and white pictures one block was used. If additional colors were used then one block was carved for each color.
Ukiyo-e means "pictures of the floating world" or "scenes of transitory importance". It is a word of Buddhist origin and refers to the impermanence of things in this world. The scenes and subjects of the prints capture a passing moment in time and give a glimpse of everyday life in Japan during that period.
During the time that Japan was ruled by the Tokugawa shoguns (250 years), Japan was a closed country. They had very little contact with the outside world. The ruling shoguns believed that this was necessary to maintain order within the country. Japanese art flourished during this time. It was also a time of economic growth in Edo especially for the merchant class. Edo is present day Tokyo and was the seat of government for the ruling shogun. Ukiyo-e prints became the art of the merchant class and there was a great demand for woodblock prints at that time.
I highly recommend the book How to Look at Japanese Art by Stephen Addiss if you would like to learn more about Japanese Art. He gives a great, easy to understand overview of several forms of Japanese art and some of its typical features. Another helpful book for this lesson is a book for older children called Art of Japan: Woodblock Color Prints by Carol Finley. It gives a brief description and history of ukiyo-e prints as well as many wonderful illustrations. If you can not easily locate these books at your local library you can still find many helpful resources on the web with more information about woodblock prints and many examples of these prints.
Other resources: Vocabulary Handout and Typical Features of Japanese Art
STORY:
 |
| The Great Wave off Kanagawa by Hokusai |
If you can not find this children's book at your local library or on inter-library loan you may be able to find one of these other books about Hokusai:
One Day in Japan with Hokusai by Julia Altmann
Hokusai: The Man Who Painted a Mountain by Deborah Kogan Ray
The Great Wave: A Children's Book Inspired by Hokusai by Veronique Massenot
However, the first book I mentioned is the one I prefer since it gives such a great explanation and pictures of the printmaking process as well as a delightful fictional story about the artist Hokusai. The artist signed his works with various names as he went through different phases and styles in his career. The name he chose for himself later in life was "Gakyō Rōjin Manji" which means the Old Man Mad About Drawing.
EXAMPLES OF ART:
Before showing the children examples of Japanese woodblock prints I went over some of the typical features of Japanese art. For class I wrote out these characteristics on a poster board to make it easy for everyone too see. This list does not include all of the characteristics of Japanese art, but gives a basic overview. I read through each one and explained them briefly. I will refer back to these characteristics throughout the lessons especially while we are viewing some examples of Japanese art.
The first print I showed the children was the Hokusai print The Great Wave off Kanagawa (see the picture above) that was described in the book excerpt that I read at the beginning of class. I asked the children what they saw in the picture that is related to nature (see the list of characteristics). Some answers were water, ocean, wave, Mount Fuji, mountain, people (the Japanese consider humans as a part of nature). We went through several of the characteristics such as space - I pointed out the asymmetry and empty space in the picture. I also pointed out how the picture captures a moment in time which is another characteristic of Japanese art and ukiyo-e woodblock prints in particular. I asked, what will happen in a few seconds to the wave? The wave will come crashing down. I pointed out Mount Fuji in the background and asked what will happen to Mount Fuji in a few seconds? Nothing. Mount Fuji is more permanent and stable in contrast to the temporary wave that will soon come crashing down and disappear. I also pointed out the smaller wave in the foreground. What does the wave look like? It is another Mount Fuji and looks similar to the real Mount Fuji in the background yet the wave is only passing. We talked a bit about how the people in the boats were reacting to the wave and how we might react in a similar situation. The Japanese try to live in harmony with nature instead of trying to control it or master it. They realize that some things in nature are more powerful than themselves such as a huge wave. The people in the boats are not panicking, but seem to be calm and bowing down to the wave and to their fate. There are many things you can point out and discuss with the children in this wonderful and powerful picture.
I went on to explain that Hokusai created many prints with Mount Fuji in them. Mount Fuji is a very popular subject in Japanese art. In some of Hokusai's prints Mount Fuji is in the background and in some it is the main subject of the picture. I showed them a Hokusai print with a large Mount Fuji that takes up almost the entire picture. If you do not have any books at your local library with examples of Japanese prints then you can do an internet search and find many examples of Hokusai's work as well as other Japanese print artists.
 |
| A print by Hiroshige |
I also showed the children a few other examples of Japanese prints by other artists. I wanted to show them examples of some of the main subjects that are depicted in Japanese prints such as kabuki theater actors, children, birds and flowers and beautiful women. I especially like the print by Harunobu, Woman Admiring Plum Blossoms at Night . Do show the children a variety of different prints, but don't overwhelm them with too many. It's better to take a little more time to really look at and discuss a few select prints than to try to go through too many at one time. One of the goals of these lessons is to help children learn to look at and think about art.
There are so many interesting subjects in Japanese woodblock prints that you can discuss with your children so have fun with it!
PROJECT:
 |
| scratching the design into the foam |
. It becomes a little pricey with shipping however, so if you aren't doing this project in a classroom setting you may want to just use the foam from one of the trays on which produce is packaged. Just cut away the sides and use the remaining bottom piece. You can use a pencil or pen to scratch the picture into the foam. Have the children scratch it deep enough to make a decent impression, but not hard enough that it tears all the way through. I offered the kids in my class some scrap paper to sketch a design first if they needed and then they used pens or pencils to draw into the foam. |
| foam tray from the grocery store |
 |
| block printing ink |
 |
| smoothing out the paper after placing it on top of the inked foam |
 |
| a finished print |
I gave the children a vocabulary handout to take home as well as a map of Japan.
Optional project:
 |
| making an inkstone out of clay |
 |
| a finished inkstone |
Friday, January 4, 2013
Byzantine Architecture
Byzantine Architecture - architecture of the Byzantine or Eastern Roman Empire centered in Constantinople.
For this lesson I focused on Byzantine church architecture. After the conversion of the Roman Emperor Constantine to Christianity, Christians could begin to erect permanent structures for worship, baptism, etc. The first churches in the Roman empire were built in the basilica style. See http://hereisthechurch.wordpress.com/2011/04/27/basilica-architecture/ for an overview of basilica style architecture.
Eventually Byzantine artists in the eastern portion of the Roman empire began to break away from the classical styles and created a new style filled with symbolism and a magnificent use of space especially through the use of a dome to represent the "dome" of heaven.
Some characteristics of Byzantine Church Architecture:
* domed central-plan church
* cross shaped building (usually a Greek cross - two arms of almost equal length)
* round arches
* circular windows
* mosaics (or frescoes) decorating the interior
* the dome functions symbolically as the "vault of heaven" and was the focus of the structure
* central plan structures were first used as tombs, baptistries and shrines to martyrs
* later developed into churches
* Constantinople was inspiration for Byzantine style in other areas
See these links for more info on Byzantine architecture:
http://www.buffaloah.com/a/archsty/byz/index.html (this page has links to examples of Byzantine architecture at the bottom of the page)
http://www.scholastic.com/browse/article.jsp?id=3753901
http://www.goarch.org/ourfaith/ourfaith8025
STORY: I read from the Story of the World: Volume 2 The Middle Ages for this lesson. There is a chapter on the Byzantine Empire. I did not read the entire chapter as I try to keep the story portion of class to 5-10 minutes. I just pieced together parts of the chapter and gave them a quick overview of Byzantium as well as focusing on Justinian. The Emperor Justinian was the most important ruler of what came to be known as the First Golden Age of the Byzantine Empire. He completed many important building projects in Constantinople and Italy during his reign including the beautiful Hagia Sophia Cathedral. The Hagia Sophia was rebuilt by Justinian after the previous structure was destroyed in a fire. It is considered to be the epitome of Byzantine architecture and served as a model for many other churches. The chapter in the Story of the World gives a nice description of the Hagia Sophia, especially the dome and mosaics. It is best to do this lesson before the other Byzantine art lesson I posted as this will give the children a basic understanding of mosaics.
EXAMPLES OF ART:
I focused on the Hagia Sophia Cathedral and showed the children various photos of the exterior and interior. There are many photos on the internet (see http://www.hagiasophia.com/listingview.php?listingID=19&name=Gallery) and I have included some here that are in the public domain (click on any of the images here to see them larger). You might mention to the children that the minarets were added later when the area came under Ottoman rule and are not original to the design.
I explained a bit about the different types of early churches. The first churches and other Christian buildings were based on either rectangular Roman basilicas or round-domed structures also known as central-plan churches. The basilica plan churches usually included an atrium (a forecourt), the narthex (an entrance or lobby area), a long central area known as the nave and an apse (a semicircular projection). Sometimes there is also a transept that crosses the nave horizontally near the apse. With the transept the building is T-shaped and known as a Latin-cross plan. Central-plan structures with domes over the center were first used as tombs, baptistries and shrines to martyrs. Central-plan churches usually have an atrium, a narthex and an apse, but the nave is usually much shorter. In basilican churches the focus of worshipers is drawn toward the apse. In the central-plan church the dome is the focus. As mentioned above, the dome functions symbolically as the "vault of heaven" and draws the gaze of worshipers upward. Often a fresco or mosaic of Christ Pantocrator is found inside the central dome. The central-plan church (also sometimes referred to as the Greek-cross plan) is characteristic of Byzantine church architecture. If you have access to the Marilyn Stokstad Art History book (volume 1), there is nice example of these two types of church architecture in the Early Christian, Jewish and Byzantine Art chapter. This quiz that goes along with the Art History book I mentioned shows a nice example of a central-plan church (the answer to the question for that diagram is C: atrium, narthex, apse, dome) as well as a basilica church plan at the bottom of the page.
Here are some links with examples of Byzantine architecture that you may find helpful:
http://www.greeceathensaegeaninfo.com/h-athens/byzantine/byz-archetecture-primer.htm
http://www.learn.columbia.edu/ha/html/byzantine.html (this website has some nice 360 degree panoramas - you will need QuickTime to run it.)
PROJECT: We did a very simple project for this lesson. I gave the children pencils, markers and paint and had them design their own Byzantine style building. I included some gold paint since the use of gold is very prevalent in Byzantine art and architecture. I used standard sized white card stock for their pictures so they would fit in their 3-ring binders and the card stock is sturdier for painting. You can use any kind of paper however.
Another idea if you would like to focus on the layout of the interior of a Byzantine style church (or a basilican style church as a contrast) is to have the child(ren) build a floor plan of a church out of some sort of blocks (such as wood blocks, Legos, etc.). Then you could point out the different areas such as the narthex, apse, nave, etc. This would be a great project for the kinesthetic learner.
I used the same handout as I did for the other Byzantine Art lesson as these two lessons really go together. Again, it would be a good idea to present this lesson on architecture first if you are using the Story of the World as it gives a nice introduction to mosaics which we discussed in the second lesson. Here is a link to the handout I created: Byzantine Art Vocabulary Handout
And here is a link to the other lesson I posted on Byzantine Art.


 |
| Hagia Sophia |
Eventually Byzantine artists in the eastern portion of the Roman empire began to break away from the classical styles and created a new style filled with symbolism and a magnificent use of space especially through the use of a dome to represent the "dome" of heaven.
Some characteristics of Byzantine Church Architecture:
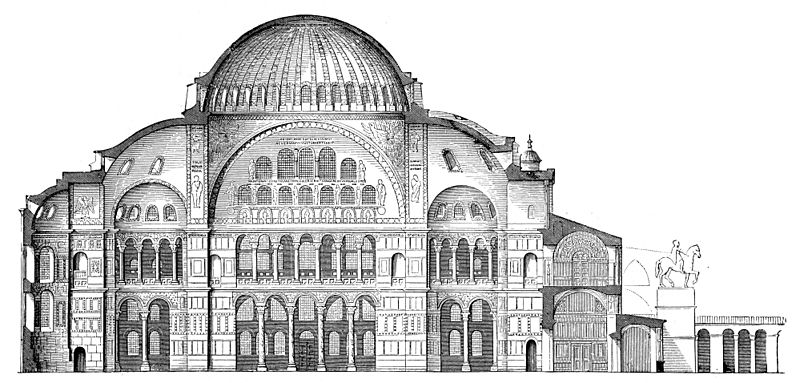 |
| Cross-section of Hagia Sophia |
* cross shaped building (usually a Greek cross - two arms of almost equal length)
* round arches
* circular windows
* mosaics (or frescoes) decorating the interior
* the dome functions symbolically as the "vault of heaven" and was the focus of the structure
* central plan structures were first used as tombs, baptistries and shrines to martyrs
* later developed into churches
* Constantinople was inspiration for Byzantine style in other areas
See these links for more info on Byzantine architecture:
http://www.buffaloah.com/a/archsty/byz/index.html (this page has links to examples of Byzantine architecture at the bottom of the page)
http://www.scholastic.com/browse/article.jsp?id=3753901
http://www.goarch.org/ourfaith/ourfaith8025
 |
| Mosaic of the Emperor Justinian |
EXAMPLES OF ART:
I focused on the Hagia Sophia Cathedral and showed the children various photos of the exterior and interior. There are many photos on the internet (see http://www.hagiasophia.com/listingview.php?listingID=19&name=Gallery) and I have included some here that are in the public domain (click on any of the images here to see them larger). You might mention to the children that the minarets were added later when the area came under Ottoman rule and are not original to the design.
 |
| Floor Plan of the Hagia Sophia |
 |
| Interior of Hagia Sophia |
Here are some links with examples of Byzantine architecture that you may find helpful:
http://www.greeceathensaegeaninfo.com/h-athens/byzantine/byz-archetecture-primer.htm
http://www.learn.columbia.edu/ha/html/byzantine.html (this website has some nice 360 degree panoramas - you will need QuickTime to run it.)
PROJECT: We did a very simple project for this lesson. I gave the children pencils, markers and paint and had them design their own Byzantine style building. I included some gold paint since the use of gold is very prevalent in Byzantine art and architecture. I used standard sized white card stock for their pictures so they would fit in their 3-ring binders and the card stock is sturdier for painting. You can use any kind of paper however.
Another idea if you would like to focus on the layout of the interior of a Byzantine style church (or a basilican style church as a contrast) is to have the child(ren) build a floor plan of a church out of some sort of blocks (such as wood blocks, Legos, etc.). Then you could point out the different areas such as the narthex, apse, nave, etc. This would be a great project for the kinesthetic learner.
I used the same handout as I did for the other Byzantine Art lesson as these two lessons really go together. Again, it would be a good idea to present this lesson on architecture first if you are using the Story of the World as it gives a nice introduction to mosaics which we discussed in the second lesson. Here is a link to the handout I created: Byzantine Art Vocabulary Handout
And here is a link to the other lesson I posted on Byzantine Art.


Tuesday, October 30, 2012
Byzantine Art
 This was a lesson on Byzantine Art that I presented to my class.
During this lesson I focused on icons and mosaics of the Byzantine era. I presented this lesson two different times with a different story and slightly different project each time. I will explain both.
Here is a brief explanation of Byzantine Art and a timeline to give you some background info.
STORY:
For the story portion I read a children's version of the story of St. Catherine of Alexandria from the book Christina's Favorite Saints by Maria Khoury. You could read any children's version of the life of St. Catherine or read a little about her yourself and retell the story in terms a child can understand. I showed the children an icon of St. Catherine from the book. You could show an icon from the internet if you do not have one on hand. I chose St. Catherine for this lesson because I wanted to focus on mosaics and show children many of the beautiful Byzantine era mosaics from the Monastery of St. Catherine on Mt. Sinai. St. Catherine was martyred in the early 4th century under the Emperor Maximinus who was carrying out a persecution of Christians. According to tradition, St. Catherine's body was carried to Mount Sinai by angels where a monastery and church were later built by order of the Byzantine Emperor Justinian. The site where Catherine's body was found is also believed to be the site of the burning bush seen by Moses. You can read more about St. Catherine here. Explain to the children that Justinian was an Emperor of the Byzantine Empire. He had many churches and monasteries built during his reign. He also attempted to restore the Roman Empire to its ancient boundaries and was able to reconquer much of that land including Italy.
Alternative Story: Another time I presented this lesson I read a story of St. Constantine and his mother St. Helen from A Child's Paradise of Saints. There is also a story of Sts. Constantine and Helen in Christina's Favorite Saints. You can read any children's story of St. Constantine and St. Helen or retell the story for the children focusing on Constantine's conversion to Christianity and St. Helen's finding of the Cross of Christ and the importance of the Cross to the Church.
EXAMPLES OF ART:
I showed the children many photos of the Monastery of St. Catherine from the book The Monastery of Saint Catherine at Mount Sinai: The Church and Fortress of Justinian. I showed them a few photos of the monastery grounds themselves and of the precious art work that is preserved there. I focused mainly on the mosaics. You may be able to request this book on inter-library loan or simply show photos of the monastery and mosaics from sources online. I explained a bit about icons and that they are a sacred and spiritual form of art that include many symbols to convey a deeper spiritual meaning. They are paintings or mosaics of the Lord Jesus Christ, Mary the Mother of God, of Angels and Saints. Read here and here for a further explanation of icons. The book Pictures of God: A Child's Guide to Understanding Icons is also helpful in explaining icons to children.
(See bottom of this post for more info on Byzantine Icons)
I explained that a mosaic is a picture or pattern made by arranging together small colored pieces of stone, tile, or glass. Some of the tiles in the Basilica of San Vitale in Ravenna were set at a slight angle to reflect light and cause special color effects. Mosaics were sometimes used in churches instead of fresco paintings because they were not as susceptible to humidity.
You can show the children mosaics of Emperor Justinian and his wife the Empress Theodora from Ravenna, Italy. Khan Academy has a helpful video with photos of the interior of the Basilica of San Vitale in Ravenna.
PROJECT:

 For the project I had the children create a mosaic picture with squares of colored paper. I cut the paper out ahead of time and placed it by color in bowls. I included some special shimmery gold colored paper since Byzantine mosaics and other types of Byzantine art often included gold tiles or gold leaf. I purchased the special paper at Hobby Lobby where you can buy paper by the sheet. I used construction paper and other colored paper that I had on hand for the other pieces. I let the kids trim their pieces if they wanted to make their picture more precise. They glued their paper pieces onto poster board with glue sticks. I cut the poster board small enough that it would fit in their notebooks. You can use any size, but I've found that most kids are intimidated by a larger piece of paper when trying to fill it with small mosaic pieces.
Alternative materials: When doing this project previously I used dried beans for the mosaics instead of paper. I used black beans, white beans, red beans, kidney beans and green split peas to give the kids a variety of colors. We glued the beans onto a piece of poster board using tacky glue. That was the lesson during which I read the story of Sts. Constantine and Helen. We had focused quite a bit on the cross and I had showed them different forms of the cross used in art so many of the children included a cross in their mosaics.


 HANDOUTS: I gave the children a list of terms related to Byzantine Art. I used this handout for two lessons. The second lesson focused on Byzantine Architecture. I will post that lesson next.
I also gave the children a map of the Byzantine Empire around 565 AD at the death of Emperor Justinian. I had them color in the area that was included in the Byzantine Empire at that time. I used the map from this website. I copied the image and pasted it into a blank document so I could enlarge it a bit.
LIST OF SUGGESTED BOOKS AND LINKS:
Christina's Favorite Saints
A Child's Paradise of Saints
The Monastery of Saint Catherine at Mount Sinai: The Church and Fortress of Justinian
Pictures of God: A Child's Guide to Understanding Icons
Larousse Encyclopedia of Byzantine and Medieval Art
Art History, Vol. 1
Byzantine Art Vocabulary Handout
Byzantine Art Timeline - http://www.huntfor.com/arthistory/medieval/byzantine.htm
St. Catherine of Alexandria - http://orthodoxwiki.org/Catherine_of_Alexandria
St. Helen
Byzantine Art images - http://www.proprofs.com/flashcards/cardshowall.php?title=chapter-4-byzantine-art-before-iconoclasm
Explanation of Icons - http://www.iconsexplained.com/iec/byz_about_byzantine_icons.htm
http://www.monasteryicons.com/cgi-bin/hazel.cgi?action=SERVE&item=tools/article_detail.hzml&request=articledetail&article=1
Video about Byzantine Art (San Vitale Mosaics) - http://smarthistory.khanacademy.org/byzantine-justinian.html

Additional Info on Icons:
When teaching kids about icons I like to show them a few examples of icons (I have quite a few on hand, but you can print off copies from the internet) and I explain some of the symbolic details of these icons. Children really like looking for these details. Some examples are the color of clothing used. The Theotokos (Greek for God-Bearer) wears red outer garments and blue inner garments. The red is the color of humanity. Blue is the color of divinity so her inner garments are blue since she carried God (Jesus who was fully God) inside of her. Jesus appears inicons wearing blue outer garments and red inner garments - the opposite of Mary, the Theotokos. The divine person of Jesus put on or took on our humanity. Another symbol used is a cloth draped across the background objects. This signifies that the scene is taking place indoors. You will see this often in the Annunication icon. Also in the Annunication, Mary is usually depicted holding some yarn. This signifies that Jesus is already being knit in her womb. In some icons Saints are often shown with objects that are associated with them such as St. Katherine and a wheel that was supposed to be used to torture her, but which broke apart when she touched it. There are lots of interesting symbols to point out to children in icons. I usually talk about icons in a lesson with Byzantine mosaics and show the children some painted icons, but also mosaic icons in famous churches- then we do the mosaic project. Children could also color in a line drawing of an icon of Jesus or Mary and be instructed to pretend to be an iconagrapher and color it in very carefully and reverently using the correct symbolic colors. You could talk a little about iconographers and how they need to have a good relationship with God, attend church regularly and pray often and before they begin an icon. The artist also adheres to very strict criteria when creating the icon. The facial features are often enlongated, everything looks very 2-dimensional, etc. This is to give the icon a feeling of something spiritual with a deeper meaning instead of depicting the objects and people more realistically and earthly. I like to use the children's book Pictures of God by John Kosmas Skinas as a guide when teaching children about icons.
Monday, October 22, 2012
Early Christian Art
This is an Art History lesson I did on Early Christian Art.
 I focused on the catacombs of ancient Rome and the Christian symbols found painted and carved there since this is one of the earliest known examples of Christian art. The lessons are generally broken up into three parts.
STORY
I read this story to the children that I wrote which tells about a Christian boy from ancient Rome walking through the catacombs with his family. If I have a small group of children I like to sit in a circle on the floor while I read the story. If we are in a more formal setting then the children sit around a table while I read to them.
EXAMPLES OF ART
Next I showed the children examples of art from the catacombs. This is a good time for discussion and questions from the children. I mostly referenced the book The Catacombs of St. Callixtus: History, Archaeology, Faith. I also showed some examples of Christian symbols from an Art History book I got on PaperBack Swap and some examples I printed off from the internet. I only own Volume 1 of Art History by Marilyn Stokstad, but it has been really helpful and I highly recommend it. I've used it as a resource for many of my art history lessons. Volume 1 covers pre-historic art through the art of the middle ages. My local library has a larger volume of the same book. I have the 1st edition, but there are many newer editions available used online. There is a page of Christian symbols and an explanation of different Christian crosses in the Stokstad book that I showed to the children and gave them copies to look at while doing their project. This website has some good links to early Christian symbols also.
The Christian symbols listed in the Art History book in the Early Christian, Jewish and Byzantine Art chapter are the Dove, Fish, Lamb (Sheep), Four Evangelists, Monograms (alpha and omega, chi rho) and the Latin, Greek, Tau, St. Peter's, Russian, Papal and Maltese (Crusader's) Crosses. You can find some of these symbols on the handout link below or on the internet.
I gave the children a handout which explained various terms and gave examples of several Christian symbols. You can find that document here.

I also gave them a map of Ancient Rome to keep in their notebooks. I used a map from Olde World Style Maps which can be purchased here. I have used these maps for various lessons and I sometimes use maps from the Story of the World Activity books for whatever time period we are studying. The closest map I could find in the the Olde World Style Maps for the early Christian time period was a map of Ancient Rome 40 BC which is a little early for this lesson, but close enough. There is also a map of Rome at the time of early Christianity in The Story of the World Activity Book that you could use if you have access to that book. I had the kids shade in the area on their map that showed the extent of Ancient Rome at that time.

PROJECT
We moved to the table and I gave the children blank paper (I used regular copy paper) and colored pencils and markers so they could draw some of the Christian symbols themselves. I asked them to imagine themselves as an artist decorating the tomb of a Christian in the catacombs. My 8 year old daughter drew a number of different symbols while my 11 year old son decided to draw all of the various crosses I had showed the students from the Art History book.
I also have a very simple line drawing that I made of the area around a tomb in the catacombs. You can print it out and have your child decorate it with Christian symbols. It can be found here.
This was a fairly simple project that any age child could complete at their own ability level, but it gave the children a good introduction to early Christian art and symbols. Unfortunately I didn't take many photos of the projects the students completed the day we did this project in class. You can click on the photos included here to see them larger.


Side note on 3-ring binder notebooks: This project was the first of a ten week session on Early Christian Art and Art of the Middle Ages. I had 8 students in the class ranging in age from 6-12. I asked each child to bring a three-ring binder in which to keep their handouts, maps and art work. Some projects were three-dimensional and wouldn't fit in the binders, but overall the binder system worked well for a longer session like this. For the shorter sessions I didn't ask the children to bring binders, but I still often gave them handouts. If you are going to do art history for an extended length of time it is a nice idea for the student to keep a three-ring binder to keep each week's materials. One semester I also took photos of the projects that would not fit in the binders and made a couple of simple scrapbook pages with those photos for each child to put in their binder. It makes a great memento of what the children have learned and the projects they have completed.
 I focused on the catacombs of ancient Rome and the Christian symbols found painted and carved there since this is one of the earliest known examples of Christian art. The lessons are generally broken up into three parts.
STORY
I read this story to the children that I wrote which tells about a Christian boy from ancient Rome walking through the catacombs with his family. If I have a small group of children I like to sit in a circle on the floor while I read the story. If we are in a more formal setting then the children sit around a table while I read to them.
EXAMPLES OF ART
Next I showed the children examples of art from the catacombs. This is a good time for discussion and questions from the children. I mostly referenced the book The Catacombs of St. Callixtus: History, Archaeology, Faith. I also showed some examples of Christian symbols from an Art History book I got on PaperBack Swap and some examples I printed off from the internet. I only own Volume 1 of Art History by Marilyn Stokstad, but it has been really helpful and I highly recommend it. I've used it as a resource for many of my art history lessons. Volume 1 covers pre-historic art through the art of the middle ages. My local library has a larger volume of the same book. I have the 1st edition, but there are many newer editions available used online. There is a page of Christian symbols and an explanation of different Christian crosses in the Stokstad book that I showed to the children and gave them copies to look at while doing their project. This website has some good links to early Christian symbols also.
The Christian symbols listed in the Art History book in the Early Christian, Jewish and Byzantine Art chapter are the Dove, Fish, Lamb (Sheep), Four Evangelists, Monograms (alpha and omega, chi rho) and the Latin, Greek, Tau, St. Peter's, Russian, Papal and Maltese (Crusader's) Crosses. You can find some of these symbols on the handout link below or on the internet.
I gave the children a handout which explained various terms and gave examples of several Christian symbols. You can find that document here.

I also gave them a map of Ancient Rome to keep in their notebooks. I used a map from Olde World Style Maps which can be purchased here. I have used these maps for various lessons and I sometimes use maps from the Story of the World Activity books for whatever time period we are studying. The closest map I could find in the the Olde World Style Maps for the early Christian time period was a map of Ancient Rome 40 BC which is a little early for this lesson, but close enough. There is also a map of Rome at the time of early Christianity in The Story of the World Activity Book that you could use if you have access to that book. I had the kids shade in the area on their map that showed the extent of Ancient Rome at that time.

PROJECT
We moved to the table and I gave the children blank paper (I used regular copy paper) and colored pencils and markers so they could draw some of the Christian symbols themselves. I asked them to imagine themselves as an artist decorating the tomb of a Christian in the catacombs. My 8 year old daughter drew a number of different symbols while my 11 year old son decided to draw all of the various crosses I had showed the students from the Art History book.
I also have a very simple line drawing that I made of the area around a tomb in the catacombs. You can print it out and have your child decorate it with Christian symbols. It can be found here.
This was a fairly simple project that any age child could complete at their own ability level, but it gave the children a good introduction to early Christian art and symbols. Unfortunately I didn't take many photos of the projects the students completed the day we did this project in class. You can click on the photos included here to see them larger.


Side note on 3-ring binder notebooks: This project was the first of a ten week session on Early Christian Art and Art of the Middle Ages. I had 8 students in the class ranging in age from 6-12. I asked each child to bring a three-ring binder in which to keep their handouts, maps and art work. Some projects were three-dimensional and wouldn't fit in the binders, but overall the binder system worked well for a longer session like this. For the shorter sessions I didn't ask the children to bring binders, but I still often gave them handouts. If you are going to do art history for an extended length of time it is a nice idea for the student to keep a three-ring binder to keep each week's materials. One semester I also took photos of the projects that would not fit in the binders and made a couple of simple scrapbook pages with those photos for each child to put in their binder. It makes a great memento of what the children have learned and the projects they have completed.
Sunday, October 21, 2012
Inspiration......
I have been teaching art history classes for children for about 2 1/2 years now. I first offered a basic drawing class for children and then I was looking for ideas for a different type of class that I could do with mixed ages. I came across this book (Art in Story) at my local library and well, the rest is history! I was inspired by the author's idea of using stories to teach art history in her elementary school classroom. Children love stories because they can be so interesting and engaging. Stories bring history to life for children by making the events and people more real. So I was inspired to begin a new class for kids involving art history. I also happen to love history (that was my major in college) and I love to continue to learn new things. So I've found preparing for the classes to be a great motivation to learn more myself.

The basic format the author of Art in Story uses is reading aloud a story to the children about a particular time period or a particular artist or people group, showing the children examples of art work from that time period, having the children write a journal entry and then doing a hands-on project. I followed this format initially, but eventually dropped the journal portion especially as I began to do shorter sessions of classes. I have had kids mostly ages 7-13 in the class. I have had a few younger kids whose parent stayed to help them with their projects. Most of the kids seemed to really enjoy the classes and the projects. At first I followed the stories written in the book, but sometimes I would substitute a story from the history book I was using (Story of the World) or read a picture book for that lesson. I have also expanded some of the subjects in the book to make more lessons on a particular era and even written a few stories of my own in the style of the author. I use mostly books from the library to show examples of art work and I sometimes order books on inter-library loan. I wanted to share this great resource here and how it has inspired me to offer these classes. It can be used in a classroom setting, a homeschool co-op or within a family.
I will be sharing some of the projects I have completed with my class on this blog including photos of our projects, the books I used in class, the types of materials I used, etc. I will begin with a series of projects I did last fall on Early Christian Art and Art of the Middle Ages. So check back here for updates. I will try to post a project each week. Hope they inspire you too!

The basic format the author of Art in Story uses is reading aloud a story to the children about a particular time period or a particular artist or people group, showing the children examples of art work from that time period, having the children write a journal entry and then doing a hands-on project. I followed this format initially, but eventually dropped the journal portion especially as I began to do shorter sessions of classes. I have had kids mostly ages 7-13 in the class. I have had a few younger kids whose parent stayed to help them with their projects. Most of the kids seemed to really enjoy the classes and the projects. At first I followed the stories written in the book, but sometimes I would substitute a story from the history book I was using (Story of the World) or read a picture book for that lesson. I have also expanded some of the subjects in the book to make more lessons on a particular era and even written a few stories of my own in the style of the author. I use mostly books from the library to show examples of art work and I sometimes order books on inter-library loan. I wanted to share this great resource here and how it has inspired me to offer these classes. It can be used in a classroom setting, a homeschool co-op or within a family.
I will be sharing some of the projects I have completed with my class on this blog including photos of our projects, the books I used in class, the types of materials I used, etc. I will begin with a series of projects I did last fall on Early Christian Art and Art of the Middle Ages. So check back here for updates. I will try to post a project each week. Hope they inspire you too!
Wednesday, October 17, 2012
St. Euphrosynos
One of my favorite Saints - St. Euphrosynos the Cook whose feast day is celebrated on September 11.
This year I read the story of St. Euphrosynos from the Children's Garden of the Theotokos curriculum. I really love this version of his story as well as this beautiful curriculum. Another story you could read to children is the book The Boy, A Kitchen And His Cave. More information about St. Euphrosynos can also be found at orthodoxwiki or the OCA website.
Children find the story of St. Euphrosynos especially interesting and full of wonder. It's a great way to help them learn about humility, patience and striving for continuous prayer as they learn how a simple cook attained such spiritual heights and closeness to God that he was allowed to walk in Paradise.

As I read the story from the Children's Garden of the Theotokos I used some props to help tell the story. I used very simple wood peg figures that I made for St. Euphrosynos and the Abbot of his monastery, red glass beads to represent the apples and a few other items I had on hand to represent St. Euphrosynos' work in the monastery kitchen (a barrel), the trees in Paradise and the chapel. These seem to help my kids pay attention and remember the story better.
 After the story we made an apple sun catcher to hang in a window. I adapted this craft from another one I saw for the Fruits of the Spirit. That craft involved a garland of smaller apples with one Fruit of the Spirit written on each apple. I chose to simplify and just have each child make one larger apple. I used clear contact paper, a black Sharpie marker and red tissue paper. Just a few simple supplies needed - my favorite kind of craft!

 I drew freehand an apple, 6 - 8 inches wide, on a piece of contact paper. Then I peeled the back off and let each child place pieces of torn tissue paper onto the sticky side inside the outline of the apple. You could cut the tissue paper into small pieces instead of tearing them. This was a simple project even for my youngest child. When they were done I placed another piece of contact paper on top to seal in the paper and then let each child cut out his or her apple. Make sure to leave a little edge of contact paper around the tissue paper to keep it sealed together.

Then we talked a little about the Fruit of the Spirit and other virtues that St. Euphrosynos attained and I asked each child which they would like to ask God to help them work on in their own lives. My kids chose generosity, patience and self-control. I thought I might have to help my 4 year old a bit with choosing something for his apple, but he quickly chose self-control. I wrote each virtue that the children chose on their apples and then we hung them in the window.

They came out very beautiful and will hopefully be a good reminder for the children of character qualities they would like to work on.
Here are some other great craft ideas for remembering St. Euphrosynos.
I had hoped to make a yummy apple treat that day to help us celebrate, but I ran out of time so we had to settle for plain apple slices (which were pretty yummy by themselves!). The sweetness of the apples reminds us of the sweetness of Paradise and of God's great mercy.
Troparion for St. Euphrosynos the Cook
You lived in great humility, in labors of asceticism and in purity of soul, O righteous Euphrosynos. By a mystical vision you demonstrated the Heavenly joy which you had found. Therefore make us worthy to be partakers of your intercessions.
This year I read the story of St. Euphrosynos from the Children's Garden of the Theotokos curriculum. I really love this version of his story as well as this beautiful curriculum. Another story you could read to children is the book The Boy, A Kitchen And His Cave. More information about St. Euphrosynos can also be found at orthodoxwiki or the OCA website.
Children find the story of St. Euphrosynos especially interesting and full of wonder. It's a great way to help them learn about humility, patience and striving for continuous prayer as they learn how a simple cook attained such spiritual heights and closeness to God that he was allowed to walk in Paradise.

As I read the story from the Children's Garden of the Theotokos I used some props to help tell the story. I used very simple wood peg figures that I made for St. Euphrosynos and the Abbot of his monastery, red glass beads to represent the apples and a few other items I had on hand to represent St. Euphrosynos' work in the monastery kitchen (a barrel), the trees in Paradise and the chapel. These seem to help my kids pay attention and remember the story better.


 I drew freehand an apple, 6 - 8 inches wide, on a piece of contact paper. Then I peeled the back off and let each child place pieces of torn tissue paper onto the sticky side inside the outline of the apple. You could cut the tissue paper into small pieces instead of tearing them. This was a simple project even for my youngest child. When they were done I placed another piece of contact paper on top to seal in the paper and then let each child cut out his or her apple. Make sure to leave a little edge of contact paper around the tissue paper to keep it sealed together.
Then we talked a little about the Fruit of the Spirit and other virtues that St. Euphrosynos attained and I asked each child which they would like to ask God to help them work on in their own lives. My kids chose generosity, patience and self-control. I thought I might have to help my 4 year old a bit with choosing something for his apple, but he quickly chose self-control. I wrote each virtue that the children chose on their apples and then we hung them in the window.

They came out very beautiful and will hopefully be a good reminder for the children of character qualities they would like to work on.
Here are some other great craft ideas for remembering St. Euphrosynos.
I had hoped to make a yummy apple treat that day to help us celebrate, but I ran out of time so we had to settle for plain apple slices (which were pretty yummy by themselves!). The sweetness of the apples reminds us of the sweetness of Paradise and of God's great mercy.
Troparion for St. Euphrosynos the Cook
You lived in great humility, in labors of asceticism and in purity of soul, O righteous Euphrosynos. By a mystical vision you demonstrated the Heavenly joy which you had found. Therefore make us worthy to be partakers of your intercessions.
Subscribe to:
Posts (Atom)